Transferring Data – the Studio Organizer 7

You can transfer your Studio Organizer 7 data from your school computer to your home computer, make changes at home, then return to school the next day and transfer the changes you made last night to the school computer. You can transfer data from a Macintosh to PC, then back again, and you can continue to record attendance on the school computer if you wish.

It's also possible to set up a dedicated attendance recording computer in your school using the Transfer Data Wizard. Please click the Built in Help link when the Studio Organizer is running and select “Networking" from the drop down list of categories and read “Attendance Computer: No Network Required.”
 The Transfer Data Wizard is a very popular FREE feature. All you need is a USB flash drive. There are two caveats:

First, you cannot use the Studio Organizer 7 on two different computers at the same time and later merge the data. The only exception to this is attendance. (This will be explained below.) This means you can only use the Studio Organizer 7 on ONE computer at a time.

Be SURE changes are not made to student data (other than attendance) on the school computer while you are editing the data at home.

If you need multiple users simultaneously accessing all the features of the Studio Organizer at the same time please view the Networking page.

Second, you will begin the steps below on your Primary computer. Your registration code is tied to your Primary computer so please be SURE you've entered your Registration Code by following the instructions in the Registration Code email. When you use the Transferring Data Wizard your Primary Registration goes with your data to the new computer, so the second computer does not need a Registration Code.

Using a USB flash drive you're able to move your Studio Organizer 7 to a different computer, even one that does not have an internet connection.

Please be sure to use the Transfer Data Wizard exclusively for moving data to a different computer. There are numerous anti-piracy and anti-tampering safeguards built into the Studio Organizer 7 to prevent unauthorized use of the software.

Copying Your Data Files

1) Open the Studio Organizer 7 on your Primary computer with an Admin level password.

The software must be registered.

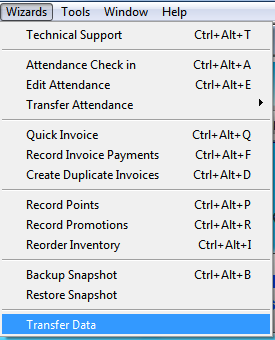
2) Select Transfer Data from the Wizards menu at the top of the screen.

Transfer-Wizard

3) Click Begin Transfer. Your data will be backed up. Nothing will be modified or deleted from this computer.

4) Click Quit. This will close the Studio Organizer 7.

5) Locate the Studio Organizer 7 folder. It should be on your Desktop.

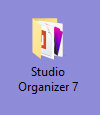
6) Open the Studio Organizer 7 folder.

It looks like this on a Windows computer...

And here it is on a Macintosh...

7) If you're on a Windows computer, you'll perform an extra step: double click and open the Data folder.

Macintosh users: skip this step. You're already viewing the window you need for the next step.

8) Select the 1_TSO 7 Data.fmp12 file by single clicking on it. (Do not double click.)

9) Hold the SHIFT key on your keyboard.

10) Also select the 2_TSO 7 Attendance.fmp12 file by single clicking on it. (Do not double click.)

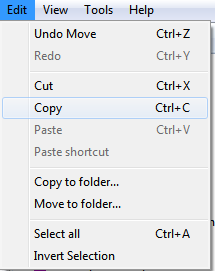
11) Release the SHIFT key. If you have both files selected go to the Edit menu and select Copy.

Transfer-Copy

If you do not have both files selected, repeat Steps 8 through 10.

12) Insert your USB flash drive and open it. The contents of the flash drive should be displayed in a window.

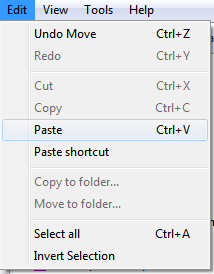
13) Go to the Edit menu and select Paste.

Transfer-Paste

14) You should now see 1_TSO 7 Data.fmp12 and 2_TSO 7 Attendance.fmp12 are on your USB flash drive.

14a) Optional - NO Internet Connection at Destination
If the computer you're going to does NOT have an internet connection, you'll want to download the Studio Organizer installer file and copy it to your USB flash drive. 

The free 10 Day Trial and the full working version are one and the same. When your data is transferred by following these instructions, your Registration Code will activate all features and disable the 10 Day Trial limitations.
 

15) Eject the flash drive using your computers required method to safely remove it. Do not simply unplug the flash drive.

From this point forward, do not change any information in the Studio Organizer on the first computer. You can look up information or create reports, but don't make any changes to student data on this computer.

Attendance is the exception: If this is the school computer you can open the Studio Organizer and begin to record attendance if you wish. Just be sure only attendance is edited.

Transferring Your Data Files

16) Go to the second computer you would like to transfer this data to.

17) Download and install the Studio Organizer 7 on the second computer if the software is not on this computer.

If you followed Step 14a, copy the installer from your USB flash drive to the Desktop, then double click the installer.

Do not launch the software.

OR

If the Studio Organizer 7 is already installed on this computer, do not install it again. Just make sure Version 7 has been closed.

The Studio Organizer cannot be running. The data files must be closed.

18) Insert the USB flash drive, select both data files then select Copy from the Edit menu. (Same as Steps 8 through 11)

19) Open the Studio Organizer 7 folder. It should be on the Desktop. (Same as Step 6)

20) If you're on a Windows computer open the Data folder. (Same as Step 7)

(Macintosh users: Skip this step. You're already viewing the window you need for the next step.)

21) Go to the Edit menu and select Paste. (Same as Step 13)

22) When prompted select OVERWRITE or Replace the existing files.

23) Open the Studio Organizer 7 using your regular password.

That's it! In a nutshell you've moved the two files that contain your data from one computer to another. You can now use the Studio Organizer 7 as you normally do.

Just be sure NOT to modify attendance records if attendance is still being recorded at school.

When you're done, you'll copy your modified data files to your USB flash drive and return them to the first computer.

Returning Your Data to the First Computer

To return your data to the first computer go to Step 1 and repeat the above instructions, however skip Step 14a.

If attendance was being recorded at school while you were making changes at home you'll want to keep the attendance file that has the most current attendance data.

To do this, modify Step 18 and only select the 1_TSO 7 Data.fmp12 file from your USB flash drive.

When you Paste in Step 21 you'll only be overwriting one file and leaving the 2_TSO 7 Attendance.fmp12 file intact.